 |
Mystical Dreams
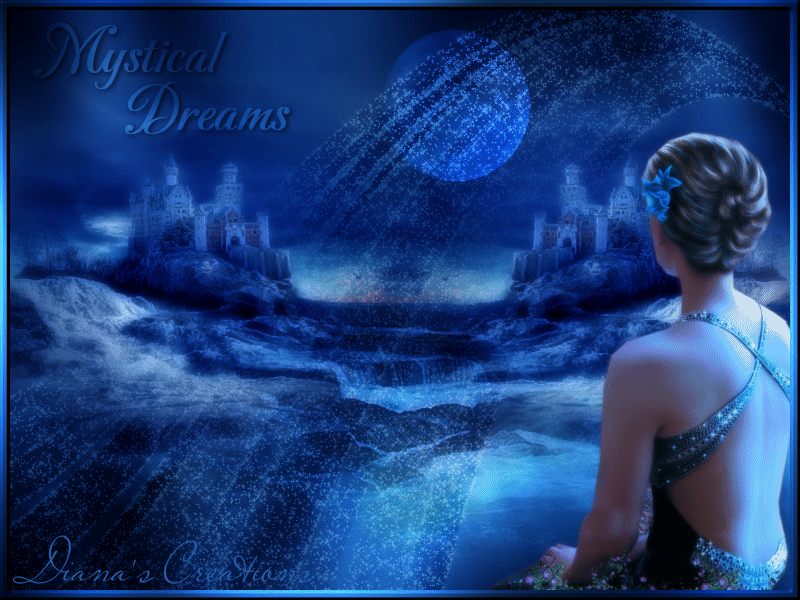
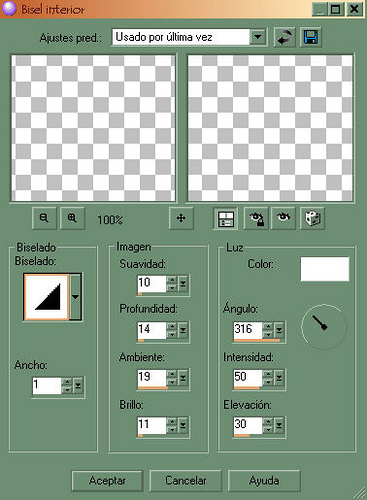
-Ready to Start- To complete this tutorial you will need the following filters: - Xenofex 2/Constellation You will also need Animation Shop. You can download filters HERE Beautiful tubes I used in my tutorial were misted and tubed by Bibiche. Now let's begin...:) Open new image 800 x 600 Go to Selections Menu and choose Select/all. Open scenery image from supplies. Delete the water mark from the scenery image and merge the the scenery image Copy / paste into selection onto the new image. Now to Selections / Select None. Open castle image from supplies. Resize to 500 x 500 pixels. Copy / paste as new layer onto the image. Place the castle to the middle left side of the image. See my image for reference. Go to Image / Mirror and the second castle will automatically fit to the right. Now using the Deform Tool, stretch each castle a bit to the middle until they both meet. Note: the castle itself does not have to meet only the outer edges of the mist that is Open woman image from supplies. Resize to 500 x 532 pixels. Copy / paste as new layer onto the image. Place the woman image to the lower right. Open Moon image from supplies and copy / paste it as new layer onto the image. Place the Moon to the top and set the Moon layers Blend / Mode to Overlay. Go to Layers and add new raster layer. Flood fill this layer using the following color: #0545a1 Note: make sure this layer is on top of everything. If it is not, just go to Layers / Bring To Front. Set this layers Blend / Mode to Soft Light. Open Text from supplies. Copy / paste as new layer onto the image. Place the text to the top left of the image. Set the text layers Blend / Mode to Overlay. Now create a new raster layer. Go to Selections / Select all. Open KL Vector Brush image from supplies. Copy / paste into selection. Now to Selections / Select None. Set the vector image layer Blend / Mode to Soft Light and lower the layer opacity to 78 %. Create another new raster layer. Now to Selections / Select all. Make a gradient using the following colors: Foreground #032061 Background #2260ae Set gradient angle to 50 and repeats to 3. Flood fill the new layer with this gradient. Go to Selections / Modify / Contract and contract by 10 pixels. Hit the Delete button on your keyboard. Go to Selections / Invert. Now to Effects / Filters / Graphics Plus and apply using default settings. Once you have the cross shadow applied, go to Effects / Inner Bevel and apply using the settings as seen below:
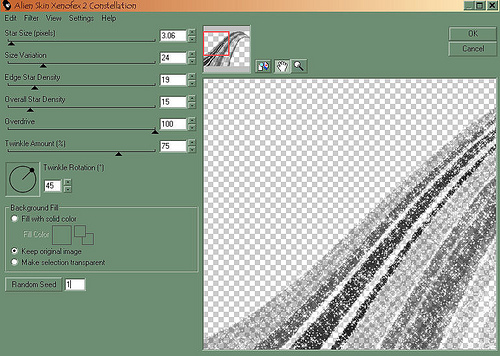
Selections / Select None. Now click on the KL Vector Image layer so that it becomes the active layer. Go to Effects / Xenofex 2 and choose the constellation filter. Apply using the settings as seen below:
Now merge all layers. Open Animation Shop. Copy/paste the image into AS as new animation. Go back to PSP and undo the changes just until the constellation effect disappears. Now again to Effects / Filters and apply the constellation again, just that this time hit the Random Seed button once. Merge all layers and paste into Animation Shop After Current Frame. Note: for those who are a bit new to AS just right click on the image that is currently there and you will Your image is now finished. You can now preview, resize if needed and save as gif.
|
|
Any resemblance to any other tutorial is coincidental Property of Diana's Creations |