Romantic
To complete this tutorial, you will need the following filter:
- Mura Meister Copies
- Filters Unlimited
You can download the filter HERE
Woman tube I used in my tutorial was supplied to me through group share.
Now let's begin...:)
Open new image 850 x 650
Open the pattern image I included in supplies.
Go to materials properties and click on the patterns tab.
Look for the pattern we just opened and set it as your foreground color.
Flood fill the new image with this pattern.
Now open another new image but this time 700 x 500.
Flood fill using the following color: #d4d0c8
Go to Effects/Filters Unlimited and apply Fine Canvas (paper textures) using default settings.
Now go to Image/Add border and add border 3 pixels wide using color white.
Add another border 5 pixels wide using color #cecac2
Now copy and paste the image onto the 850 x 650 image that we filled with the pattern.
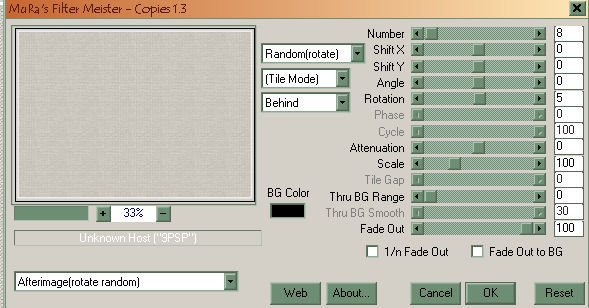
Go to Filters/Mura Meister and choose the copies filter.
Apply using the settings as seen below:
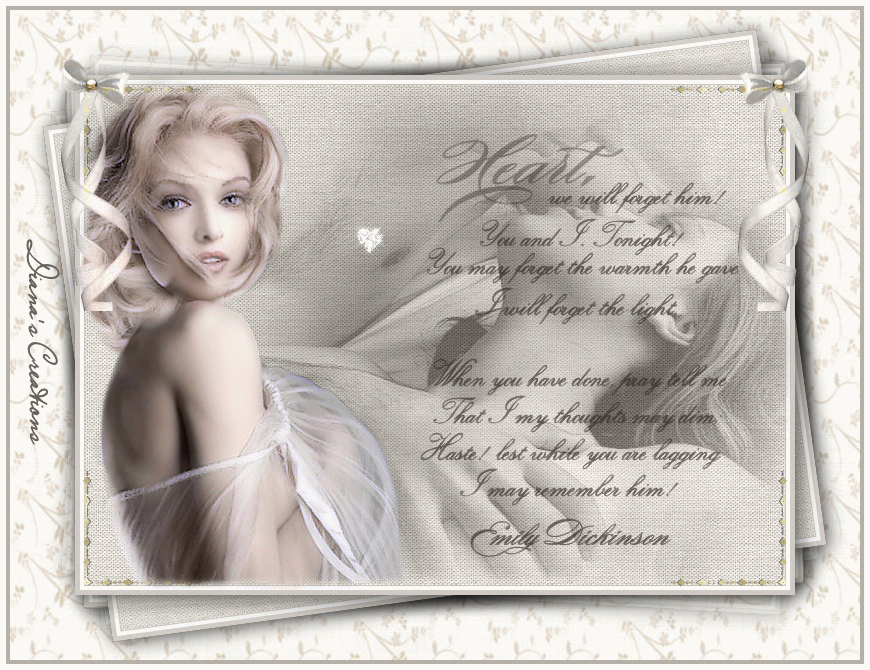
Open woman image from supplies.
Copy/paste as new layer onto the image.
Place her to the left side and erase any areas that need to be erased. (bottom)...:)
Open couple image from supplies.
Copy/paste as new layer onto the image.
Go to Image/Mirror so that the image faces the opposite direction.
Place the couple to the right as you see it placed in my image.
Erase any areas that may need to be erased.
Open gold corners from supplies.
Place one in every corner.
Open Ribbon/bow from supplies.
Copy/paste as new layer onto the image.
Change the ribbons layer blend mode to Luminance Legacy.
Place the ribbon in the upper left corner.
Go to Layers/duplicate than to Image/Mirror and the second ribbon will automatically fit in place.
Now open word art (text) from supplies.
Copy/paste as new layer onto the image.
Place the text as you see it in my image.
Place your name on the image and merge all layers.
Go to Image/Add border and add border 4 pixels wide using color #b5b1a9
Add one more border 6 pixels wide using color white.
Open Animation Shop.
Copy/paste the image into AS as new animation.
Duplicate the image 11 times so that you have a total of 12 frames.
Place the slider all the way to the left until you see frame 1.
Go to Edit/Select all.
Now open the heart animation from supplies.
Place the slider all the way to the left until you see frame 1.
Go to Edit/Select all.
Now click on the heart animation in frame 1 and drag it onto the other image.
Once you have the heart where you want it, let go of the mouse button.
Your image is now finished.
You may want to resize do to the large size.
You can do this by going to Animation Menu and choosing Resize. Enter the desired size and save as gif.
Have a very beautiful day/night....:)
Back
This tutorial was written by Diana's Creations on February 12, 2010
Any resemblance to any other tutorial is coincidental
Property of Diana's Creations
|