 |
Simply Beautiful
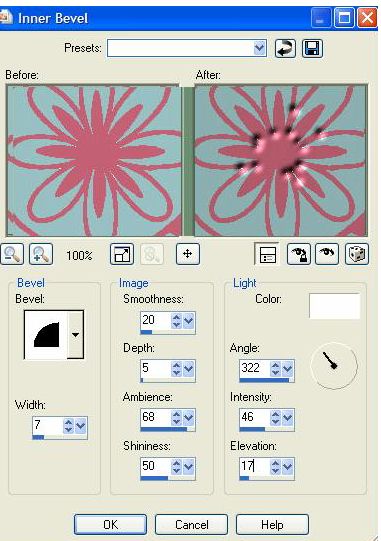
-Ready to Start- All material used in this tut was supplied to me through groups shares. Open new image 700 x 650 Flood fill with white. Open flower design included in the supplies. Resize it to 550 x 534 pixels and copy/paste as new layer onto the image. Using the Magic Wand, click on the black part of the flower. Flood fill using the following color: # c66076 Go to Selections Menu and choose Select/None. Now using the Magic wand again, click on the middle flower that was left black and flood fill it using the same color. Again go to Selections Menu and choose Select/None. Using the Magic Wand once again, click on all the white spaces left on the flower. Remember that so you can select multiple areas at the same time, just hold down the Shift key while clicking with the Magic Wand. Flood fill all the selected white spaces using the following color: #99c0c4 Once you have them all filled, go to Selections Menu and choose Select/None. Go to Effects/Inner Bevel and apply to the flower using the settings as seen below:
Now open cute girl image from supplies. Resize her to 300 x 499 pixels and copy/paste as new layer onto the image. Place her in the middle of the flower as seen in my image. Using the eraser tool erase the bottom part of the girl as you see I did in my image. Now select the text tool and using color #c66076 for the foreground and color #99c0c4 for the background, write out the word 'Simply'. Note: I used font type 'AntsyPants' size '48' and with the line width set to 2.0. Place the word to the top of the image. Again choose the text tool but this time write out the word 'Beautiful' and place it to the bottom of the image. Once the text is in place, go to Selections Menu and choose Select All. Once selected go again to Selections Menu and choose Float. You should now see only the text selected. Now again to Selections Menu and choose Selections/Modify/Contract and contract by 2 pixels. You should now see only the inner part of the text selected. Go to Effects/Filters/DSB/Bright Noise and apply using the following settings: Intensity: 40 Direction: Mix Click OK. Go to Selections Menu and choose Select/None. Now click on the flower layer so that it becomes the active layer. Go to Effects/Filters/DSB/Bright Noise and apply with the same settings as you did with the text. Merge all layers and Open Animation Shop. Copy the image by going to Edit/Copy and paste it into AS as new animation. Go back to PSP and undo the changes until you see the Bright noise that we applied to the text disappear Go to Filters/Bright Noise and click on the Mix button twice then on OK. Now to Selections Menu and choose Select/None. Click on the flower layer so that it becomes the active layer and apply the Bright Noise filter to it once again. Click on Mix twice just as you did with the text. Merge all layers and copy the image by going to Edit/Copy. Now over in Animation Shop, right click on the image you you have there and paste After Current Frame. And you are finished. You can now view and save your image as gif..:)
|
|
Any resemblance to any other tutorial is coincidental Property of Diana's Creations |