 |
Whisper My Name
-Ready to Start-
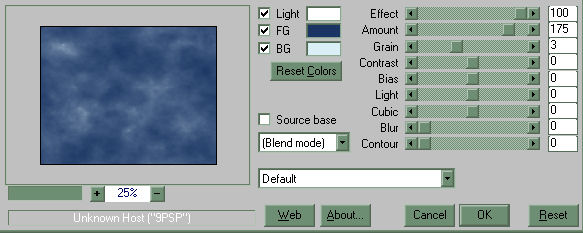
To complete this tut, you will need Mura Meisters Cloud and Perspective Tiling Filter. You can download here: You will also need DSB Flux Bright Noise Filter. You can download here The beautiful lady tube used in my tut is from Galleria PSPCyber Open new image 700 x 550. Flood fill using the following color: #1a3563 Go to Effects/Filters and choose Mura Meister Cloud and apply the settings as seen below:
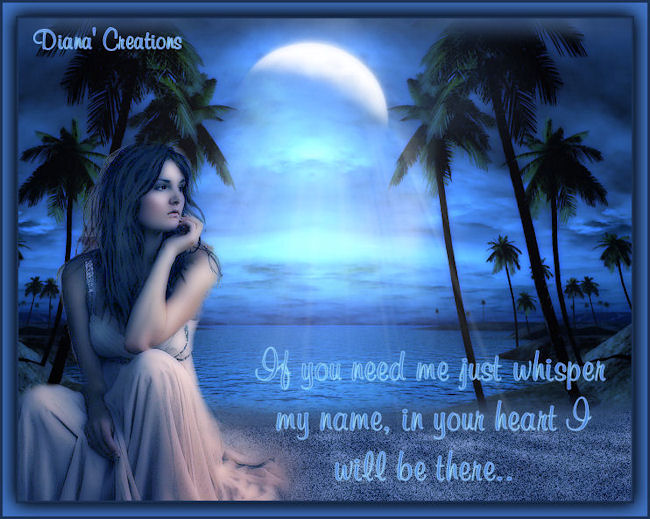
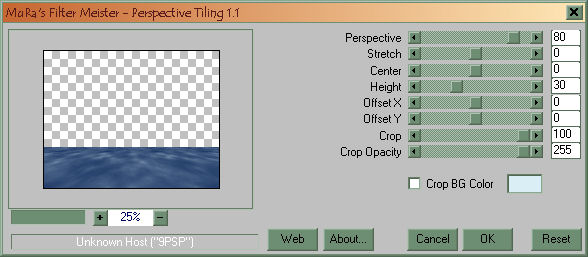
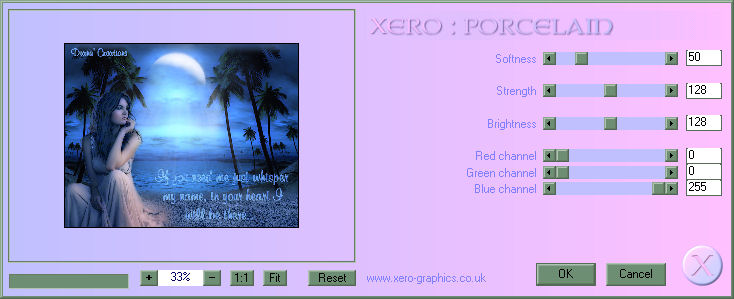
Now open the scenery image included in the supplies. Copy paste as new layer onto the blue cloudy background you just created. Place the tube to the top left of the image. Go to Layers/Duplicate then to Image/Mirror so that the duplicate fits to the right side of the image. Send the duplicate layer to the back by going to Layers Menu and choosing Send/ Back. Move both scenery images a bit more to the sides of the canvas. See my image for reference. Now using a very soft eraser (when I say soft I mean a misty type of eraser) That is so when we erase the image, it will blend in with the rest without looking so harsh. Click on the first scenery image you placed to the left and gently erase the middle area where you see it overlaps scenery number 2. Erase only until it blends in well with scenery number 2. Once you have it erased, you can just hide the window for now. Open a new image 700 x 550. Flood fill using the following color:#1a3563 Go to Effects/Mura Meister/Cloud and apply the same settings to this one as you did with the first image above Next go to Effects/Filters/Mura Meister and choose Perspective Tiling. Apply the setting as seen below. Once the perspective tiling is added go to Filters DSB Flux/ Bright Noise and apply with the following settings: Now copy and paste as new layer onto your scenery image. Place it to the bottom, see my image for reference. Again, choose a very soft misty eraser and gently erase the outer edge so that it blends in with the ground of the scenery images. Once you have that done, Open the Moon image included in the supplies. Copy/paste as new layer onto the image and place to the top of the image. Open the light ray I included in the supplies and copy/paste it as new layer onto the image. Place it to the bottom part of the Moon. See my image for reference. Open beautiful lady tube from the supplies and copy/paste as new layer onto the image. Place her to the bottom left of the image. Open text from supplies and copy paste as new layer onto the image. Place the text to the lower right of the image. Add your name and merge al layers. Now go to Effects/Filters and choose Xero Porcelain apply the settings as seen below.
Next, go to Image/Add border and add a border 3 pixels wide using the following color: #1b3256 Again to Image/Add Border and add border 15 pixels wide using the following color: Using the magic wand, click on the border you just created. Once selected, go to Selections menu and choose Invert. Next, go to Effects / Drop Shadow and apply using the following settings: Vertical 2 Horizontal 2 Opacity 90 Blur 30 Click OK. Once again, go to Effects/Drop Shadow but this time using these settings: Vertical -2 Horizontal -2 Rest of the settings same as above. Go to Selections Menu and choose Select/None. Add one last border 3 pixels wide using the following color: #1b3256 And you are finished...:)
|
|
Any resemblance to any other tutorial is coincidental Property of Diana's Creations |