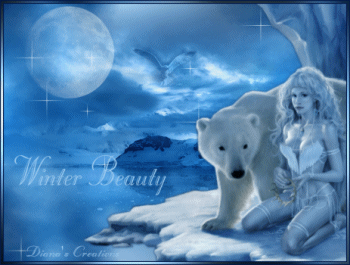
Winter Beauty
To complete this tutorial, you will need the following filters:
Graphics Plus / Cross Shadow
VM Natural / Sparkles
You can download filters HERE
Beautiful scenery image and woman image was tubed and misted by Bibiche.
Now lets' begin...:)
Open new image 800 x 600
Go to Selections Menu and choose Select all.
Open scenery image from supplies.
Delete the watermark and merge the image with the background that comes with it.
Copy / paste Into Selection.
Open woman with bear image from supplies.
Resize to 700 x 611 pixels.
Copy /paste onto the image and place to the right as you see it in my image.
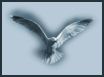
Open bird image and resize to 200 x 146 pixels.
Copy / paste onto the image and place the bird as you see it in my image.
Set the birds layer Blend Mode to Luminance Legacy and lower opacity to 44 %.
Go to Layers Menu and add a new raster layer.
Flood fill the new layer using the following color: #184873
Set the new layers Blend Mode to Soft Light.
Open Moon image from supplies.
Copy / paste as new layer onto the image.
Place the Moon to the upper left and set the Moon's layer opacity to 56 %.
Now place your text and name on the image.
Note: I used font type Stuyvesant BT, Size 72, Color: #a2cef3
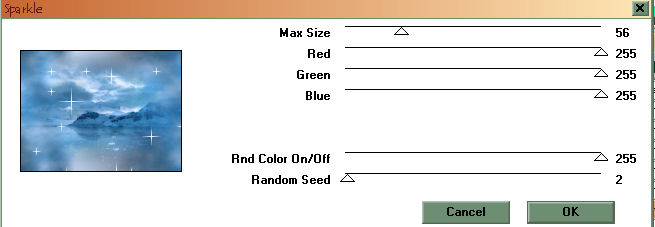
Now click on the bottom layer so that it becomes the active layer (Scenery layer).
Go to Effects / VM Natural and choose the sparkle filter.
Apply using the settings as seen below:
Next, go to Layers Menu and merge all layers.
Let's make a gradient by setting our foreground color to: #184873 and background color to: #a2cef3
Now just open Material Properties and click on the gradient tab. Choose the gradient we just made and set it as your foreground color.
Set gradient style to Linear. Angle to 50 and repeats to 3.
Now to Image / Add Border and add a border 2 pixels wide using color : #021c4a
Add border 5 pixels wide using color white.
Using the Magic Wand, select the border and flood fill with the gradient.
Go to Effects / Filters / Graphics Plus and apply Cross Shadow using default settings.
Selections / Select None.
Add one more border 2 pixels wide using color : #021c4a
Open Animation Shop.
Copy the image by going to Edit / Copy and paste into AS as new animation.
Go back to PSP and undo changes until the sparkle effect we applied disappears.
Again, go to Effects / Filters VM Natural and apply Sparkles effect with same settings, except that this time,
change the Random Seed to 50.
Merge all layers and add 3 borders using exact same colors and instructions as with the last 3.
Copy the image and paste into Animation Shop 'After Current Frame'.
One last time, go back to PSP and undo changes just until sparkle effect disappears.
Apply Sparkle effect changing only Random Speed to 100.
Merge layers and apply 3 borders with same exact colors and steps as with the others.
Copy / paste into Animation Shop ' After Current Frame'.
And you are finished..
You can now preview your image and save as gif....:)
Back
This tutorial was written by Diana's Creations on August 7, 2009
Any resemblance to any other tutorial is coincidental
Property of Diana's Creations
|