STEP 1
In your MATERIALS PALETTE
Load LIGHT BLUE ' #5e84b1 ' in your foreground
Load DARK BLUE ' #182f4c ' in your background |
|
STEP 2
Open up the smoky.jpg image in your PSP workspace
Open a new image 600 x 600
Transparent background
RASTER BACKGROUND
PSPX - X2: Colour Depth = 8bits/channel
PSPX3: Colour Depth RGB = 8bits/channel
VIEW >>> RULERS
Flood fill with DARK BLUE
LAYERS >>> NEW RASTER LAYER
Flood fill with LIGHT BLUE
|
STEP 3
LAYERS >>> NEW MASK LAYER >>> FROM IMAGE
Select the "smoky.jpg" in the Source window
|
|
STEP 4
LAYERS >>> MERGE >>> MERGE GROUP
Select your DEFORMATION tool
Mode = SCALE
use default settings
PSPX-X3:Select your PICK tool
Drag the centre left node level with the 150 pixel mark
on top ruler
Drag the centre right node level with the 450 pixel mark
on top ruler
|
|
STEP 5
Click the RESET RECTANGLE arrow
Select the MOVER tool to disengage the
DEFORMATION tool (PICK tool)
EFFECTS >>> IMAGE EFFECTS >>> OFFSET
|
|
STEP 6
LAYERS >>> DUPLICATE
IMAGE >>> MIRROR
LAYERS >>> MERGE >>> MERGE DOWN
In your LAYER PALETTE change the
BLEND MODE to DODGE
EFFECTS >>> EDGE EFFECTS >>> ENHANCE MORE
LAYERS >>> MERGE >>> MERGE VISIBLE
|
|
STEP 7
EFFECTS>>> GEOMETRIC EFFECTS >>> CIRCLE
EDGE MODE = Transparent
IMAGE >>> RESIZE = 85%
Ensure "Resize all layers" is UNCHECKED
Resample using WEIGHTED AVERAGE
Choose your SELECTION TOOL
Selection Type = Circle
Mode = Replace
Feather = 2
Antialias = Checked
Starting at 300 pixels across and 300 pixels down
drag your cursor down to 550 pixels down and release.
SELECTIONS >>> INVERT
Hit your DELETE key twice
DESELECT
|
|
STEP 8
ADJUST >>> SHARPNESS >>> SHARPEN MORE
LAYERS >>> DUPLICATE
In your LAYER PALETTE change the
BLEND MODE to SOFT LIGHT
LAYERS >>> DUPLICATE
In your LAYER PALETTE change the
BLEND MODE to DODGE
ADJUST >>> SOFTNESS >>> SOFTEN
ACTIVATE
Copy of Merged
EDIT >>> Repeat Soften
|
|
STEP 9
ACTIVATE Copy (2) of Merged
Open up the RobCarlos_NeptuneDragon_hur0112 image
in your PSP workspace
Right click on the Title Bar and select COPY from the options
Right click on the Title Bar of your tag image
and select PASTE AS NEW LAYER from the options.
EFFECTS >>> 3D EFFECTS >>> DROP SHADOW
Vertical & Horizontal offsets = 1
Colour = Black
Opacity = 60
Blur = 0
EFFECTS >>> 3D EFFECTS >>> DROP SHADOW
Use these settings >>>>>
|
|
STEP 10
Open up the believe-in-magicWA image
in your PSP workspace
Right click on the Title Bar and select COPY from the options
Right click on the Title Bar of your tag image
and select PASTE AS NEW LAYER from the options.
EFFECTS >>> 3D EFFECTS >>> DROP SHADOW
Vertical & Horizontal offsets = 2
Colour = WHITE
Opacity = 80
Blur = 0
Reposition with your MOVER tool
|
|
STEP 11
LAYERS >>> MERGE >>> MERGE VISIBLE
ADJUST >>> SHARPNESS >>> SHARPEN
LAYERS >>> NEW RASTER LAYER
Add your name
|
|
STEP 12
LAYERS >>> MERGE >>> MERGE VISIBLE
SELECTIONS >>> SELECT ALL
SELECTIONS >>> FLOAT
SELECTIONS >>> DEFLOAT
SELECTIONS >>> MODIFY >>> CONTRACT = 3
LAYERS >>> NEW RASTER LAYER
EFFECTS >>> ARTISTIC EFFECTS >>> BALLS & BUBBLES
Select the "Clear bubbles" preset
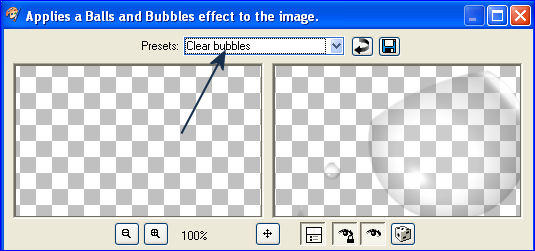
|
These should be the settings for the SHAPE Tag
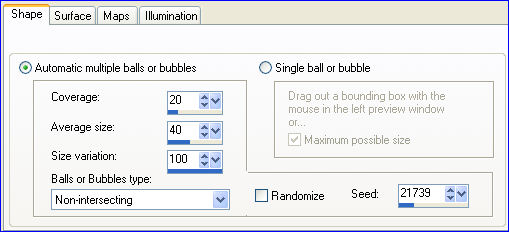
|
These should be the settings for the SURFACE Tag
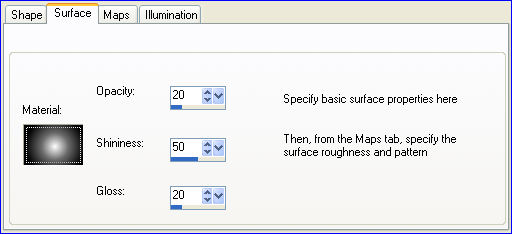
|
These should be the settings for the MAPS Tag
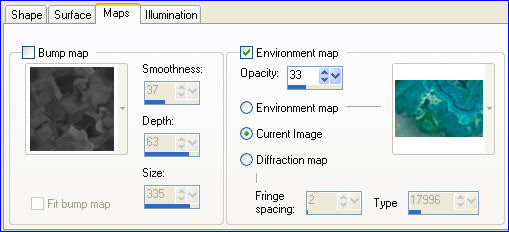
|
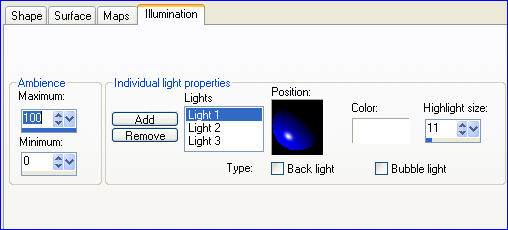
These should be the settings for the ILLUMINATION Tag
|
STEP 13
CLICK "OK"
DESELECT
LAYERS >>> MERGE >>> MERGE VISIBLE
Choose your SELECTION TOOL
Select "Create selection from:"

SELECTIONS >>> MODIFY >>> EXPAND = 5
IMAGE >>> CROP TO SELECTION
Save as .png image
|
|
|