Valentine Embossed Border
©By Snow Angel

Valentine Embossed Border
©By Snow Angel
~~~~~~~~~~~~~~~~
Tutorials Index
PSP Times Three would like to thank
©Snow Angel for allowing us to publish her tutorial.
Use this image - heart wings - to mark your place. Just drag it along as you read each line.

Supplies:
PSP version 9 was used for this tut but you can use other versions too.
Tube - ElliebearHeart01 & Ding Font - Hugware.ttf -
Download Supplies
Here
Let's Begin:
~Open Tube - ElliebearHeart01 into PSP
~Duplicate Tube and close the original (ctrl-D)
~Open Dig Font - Hugware.ttf and minimize it.
1. Make "New Image" 350X350
2. Tool - Flood Fill - color of choice or my color - #d47693
3. Adjust - Add /Remove Noise - Add Noise, Gaussian- Monochrome checked - set at 8%.
4. Tool - Click on the "Text Tool". Click on the middle of image.
5. Material Palette - Set Foreground to Null, set Background to White.
6. Ding Font - Go to your "Tools bar" and click on the "Hugware font".
7. Tool Palette settings:

Click on your keyboard the letter (i) lowercase.
8. Menu Bar - "Objects - Align - Center in canvas (Keep selected).
9. Selections - From Vector Object.
10. Selections - Load/save selection - Save selection to Alpha Channel.
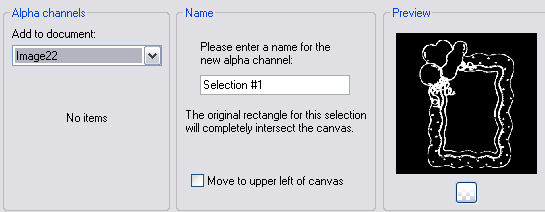
11. Layer Palette - Check (X) the eye on the Vector Layer to close it. Your image will have marching ants where the font was.
12. Layers - New Raster Layer
13. Selections - Hide Marquee
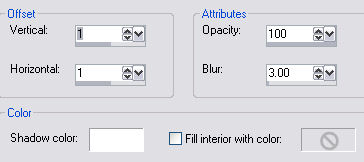
14. Effects - 3D Effects - Cutout, 1,1,100,3
15. Layers - New Raster Layer
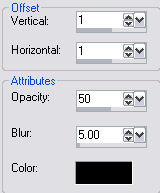
16. Effects - 3D Effects - Dropshadow, 1,1 100,5

17. Selections - Select None.
18. Layer Palette - Uncheck Vector Layer and right click on it and "convert to raster layer".
19. Adjust - Softness - Soften. Do this to raster layer 2 and 3.
20. Layers Palette - Make sure you are on raster 3, and with the opacity slider, lower the opacity to 50 % or to whatever makes your shadow softer looking according to your background color.
21. Layer Palette - Check the eye on the background layer to close it. Click on one of the other layers and "Merge Visible".
Make "New Transparent Image" 1024X370.
22. Materials Palette - Set Foreground Color to #d47693 or whatever your background color is.
23. Tool - Flood Fill - Fill "New Image" with your Foreground color.
24. Adjust - Add/Remove Noise - Add Noise (same settings) as in step 3.
25. Menu - Edit - Copy - "Font Design" Paste as New Layer onto your background.
26. Mover Tool - Move the Font Design over to the Left of your background and center it there.
27. Menu - Edit - Copy - Tube and Paste it "As New Layer".
28. Image - Resize - Percent 85% - resample using(Bicubic), Lock aspect ratio, All Layers-unchecked.
29. Effects - 3D Effects - Dropshadow - 1,1,50,5
30. Layers Palette - Click on the background
31. Effects -Image Effects - Seamless Tiling - "Default Settings".
32. For a watermark-Layers - New Raster Layer, add watermark as a selection, "Selections - select None.
33. For No watermark - Layers - Merge All (Flatten)
34. Copy the copyright layer from the tube to your image
35. File - Export - Jpg Optimizer, settings 25
You are Done! Please share your work with the group.
NOTE:
Thank you for trying my tutorial, if you have any questions please email me at snowangel_pda@yahoo.com, please add a credit to Snow Angel's Graphics with my email address in the "Footer" of your Letter.
~~~~~~~~~~~~~~~~
Any similarities to other tutorials is merely a coincidence.
©
PSP Times Three
~January 2007~