 We'll learn now how to animate a signature like this one. As we'll see, you also can use any kind of tubes or graphics if you correctly save the transparency:

 Pick the tube or graphic you want to use for your sig, and do two versions: one with the text and the other without it. Save both as transparent gif, as we saw in my previous tutorial. Apply text WITHOUT ANTIALIAS, and double check the transparency:


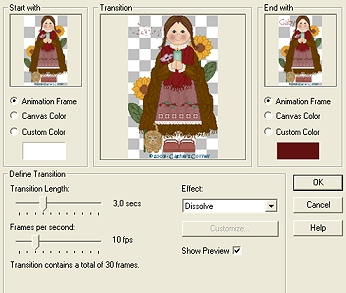
 Open Animation Shop, ands start a New Animation. Add these two images, being sure that the first one is the one without the text. You'll have a two-frames animation. Click on the first frame, and go to Effects/Insert Image Transition. Use these settings:

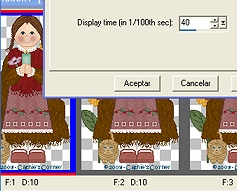
 Click OK, and go to the first frame (you have a lot of frames now!). Right click on it, and choose Frame Properties. Change the time to 40 (all the frames have 10). Do the same with the last frame in the animation, but change it to 60:

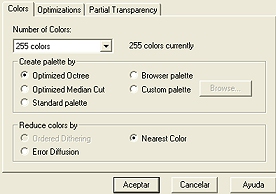
 One word about Animation Shop optimization: I really don't use optimizers, but AS apply it by itself. So, let's configure the optimizer to avoid problems with our transparency. Go to File/Optimization Wizard. In the second window (after you click "next"), you'll find a "customize" option. Click there, and use these settings. When you are ready to save the final animation, do not call the optimizer, and just use "save as":

 The same technique can be applied to any kind of graphics, if you remember not to use antialias in the text. The letters may look a little rough if the size is big, but the transparency will be perfect. I'm using a tole tube here:


