 We'll use preset shapes to make a flower pot, and we'll lear how to use the paint brush to make grass too.

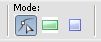
Use Shapes/Rectangle. Draw a little one (I'm zooming the sample) using two tones of brown (or the colour you want!). Remember NOT to check antialias:

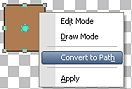
In your tool settings, click on Edit Mode. Then, right click the rectangle and choose Convert to Path. You'll see four nodes, one for each corner:
Puxh and pull the nodes to get a shape like this one. Remember to clean the pixels on both sides:

Add a new vector layer, and draw a thin rectangle over the pot, and drag it to the top of the figure:


Convert to Raster, adn shadow the pot as we use to do (Darken/Lighten tool). Now, let's add some grass!. Go to your Paint brush and use these settings:

Charge the Paint brush with two tones of green, one for right click and the other for left click. Apply in a new layer, in the top of the pot. Do not drag the paintbrush, just made some clicks, using both colours.
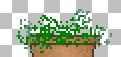
These settings give your graphic the grass effect. You can vary the size and density, but you can change Hardness or Opacity, because your transparency won't be perfect. You can also add some white clicks, like flowers, and, of course, add your own flowers to the pot!


