|
Cutout & .png
Well, let's talk a little about PNG format...
When we talk about transparencies, we think about .gif. When
we want to save a work without a background (to use it for
different graphics later), we do it in PSP or PSD format (for
Paint Shop Pro or Photoshop); sometimes, really heavy files,
and without instant preview (you have to open the program)...
What about a format which allows you to keep
a transparency, a "layer" to be used later too without
any kind of conversion or color increasement, compatible for
all graphics programs (even for web, in higher browsers),
and using a very little size???
I love cutout effect. It's my favorite. So,
I always was looking for a technique which allows to have
standard settings (without changing them when I use a different
background), and the posibility to keep some "cutout
collection" in very little files with instant preview,
using any background (cutout works are impossible to save
as .gif without a background color...), and having the liberty
to copy them and insert as new layers, using the pattern,
color, or background I want and change them a lot of times,
obtaining the cutout effect immediately. Too much? Yesssssss!!!!!!!
But I found the answer trying with a lot of settings, and
using .png format to save my cutouts. Let's see the process
step by step.
1-How to do a cutout
Yes, we all know that... but I want to tell
you some tips and settings to avoid to change the settings
to adapt the effect to different backgrounds. It looks great
using plain colors; you don't need to have a pattern. I'll
use PSP to show you; but I'll tell too how to save a
.png in Photoshop.
- Open a new image, transparent. Use the size
you want; not very small, so you will can adjust the size
of your text or dingbat and see it well.
- Fill it with your pattern, or plain color.
Try to use not very dark colors, the cutout effect works better
over light ones.
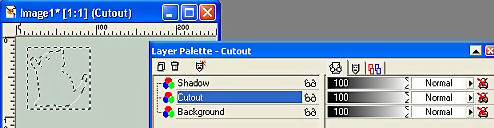
- Add two more layers, one called "cutout",
and the other, "shadow". The "shadow"
layer must be at the top.
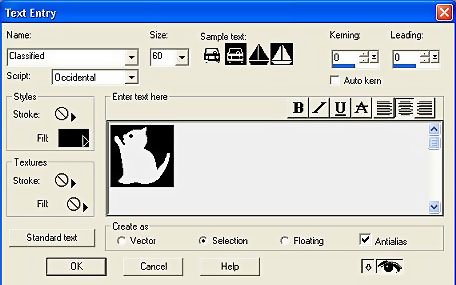
- Choose your text or dingbat (I'll use a little
cat now!), and use these settings:
- Make active the "cutout" layer
in your layer palette. You must have something like this:
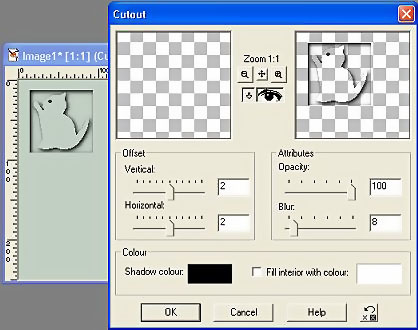
- Go to Effects/3D Effects/Cutout, and apply
these settings (the color of the shadow is black):
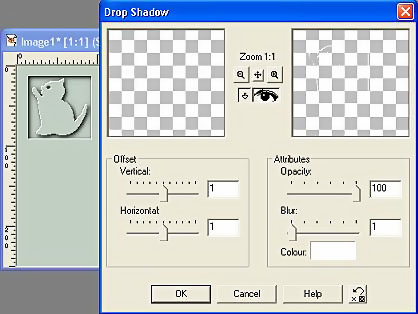
- Don't deselect, and change the active layer
to "shadow". Go to Effects/3D Effects/Drop shadow,
and, again... use my settings!
- You can deselect now. Turn off your "background"
layer, and go to Layers/Merge/Merge visible.

Cutout done! I've tried these settings in
all kind of backgrounds, and they works; so you can have them
as a standard . Of course, choose your
own preferencies, modifying the offset and the blur of the
cutout and the shadow. I don't recommend to change the opacity.
Sometimes, people wants a shadow with a color a little lighten
than the original, that's OK! (I prefer white, but it's my
taste!!!!)
If you want to give color to your cutout,
add a new layer at the top, and fill it with you chosen color.
Follow me, and we'll se how to save your "cutout
art gallery" in .png!!!
 
|
|