
Preparations: <HTML>
Those 4 sets of tags allow you to create a plain document that is readable by any web browser.
~~~~~~~~~~~~~~~~
Tutorials Index
This Lesson was written by
Cathie for PSP Times Three.
This tutorial is an introduction to HTML and is intended for beginners. This first lesson will
explain the process, give you definitions, and help you establish your first HTML page. There will
be some screen shots along the way but most of the lessons are text. Once you learn how to set up a
HTML page you will be on your way to creating web pages for your website. All HTML in this tutorial
is done using Windows Notepad. If you have a MAC, then it would be your Simple Text. There are several
special Editors available that do most of the work for you. You will
not be using those with these lessons.
A good majority of our members requested these and also are looking for web set tutorials. We feel you should first know how to use HTML before you venture into creating web sets. Those tutorials will follow once we have completed all HTML Lessons.

A website page where you can upload your finished work. There are many free sites available and even some ISP's offer you one. This is for your homework only. Once you feel confident and move on to adding other materials then you can decide if you want to keep the free site or purchase your own domain. Most free sites have an upload program right on your page area.
A Few Basic Definitions:
HTML stands for Hyper Text Markup Language which is the basic language used to write web pages.
There are 2 angle brackets < and > that are used to set HTML tags off from text part of a page. All HTML tags (codes) use these brackets.
To receive files from another computer to your own hard drive.
File Transfer Protocol is a program that is used to upload and download your files (to and from your website). You do not need this unless you own your own domain. There are several programs that will accomplish this such as MS FTP, Cute, and others.
This is the very first page of a website. If you visited PSP Times Three and used the link http://MyPSPX3.com it would take you to the home page.
These are coded HTML links that would take you to another page on the website or to another website altogether.
Example: Visit PSP Times Three. See the different color and the underline? That link will take you to the home page.
The server is the location where you keep your web pages. If you use Geo Cities for your web pages then that is your server.
These are the embedded words in the angle brackets that changes regular text into HTML. The following are used as the opening and closing tags for a HTML document: <HTML> and </HTML>
The process of sending your files from your hard drive to your server where you have your web site.
URL = Uniform Resource Locator. It is the address of a web page. Example: The URL for PSP Times Three is
http://www.MyPSPX3.com
A Basic HTML Document:
Each HTML document should contain certain HTML tags. Each document consists of head and body text. The head contains the title, and the body contains the actual text that is made up of one paragraph, lists, and other elements. Browsers need specific information because they are programmed according to HTML specifications.
Required elementms are shown in this sample basic document:
<HTML>
<HEAD>
<TITLE>My HTML Lessons</TITLE>
</HEAD>
<BODY>
<H1> HTML Lesson 1</H1>
<P> This is the first paragraph of text to say whatever you want. PSP Times Three Rocks!. It may not be a large paragraph but nonetheless it is still a paragraph.</P>
<P> This is the second paragraph of text to say whatever you want. It can be long or short but its still a paragraph.</P>
</BODY>
</HTML>
Always keep in mind the 4 required tags and their end tags. There are some browsers that will format your HTML but there are some that won't so be sure to always include them in all your HTML documents: <HTML>, <HEAD>, <TITLE>, < BODY>
About Tags:
Just as remembering the 4 required tags you need to remember that ALL tags travel in pairs. This is a VERY IMPORTANT part of HTML and you always need to remember it. Example: When you use the paragraph tag <P> you should close that when you finish writing your paragraph. </P> NOTE how the closing tag has a backslash. Each tag you close should have the backslash before the tag name. See these examples:
<HEAD>
<TITLE>
</TITLE>
</HEAD>
<BODY>
</BODY>
</HTML>
Let's Begin!
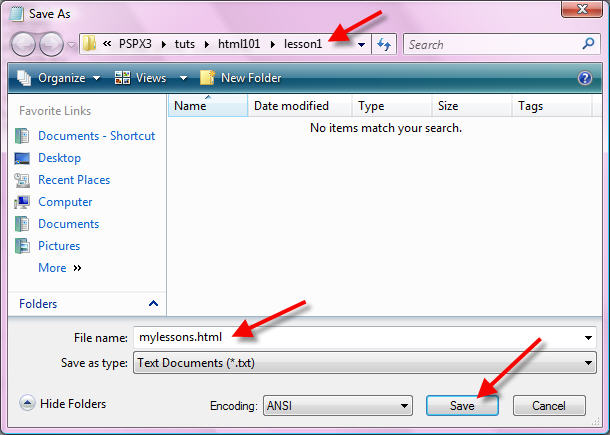
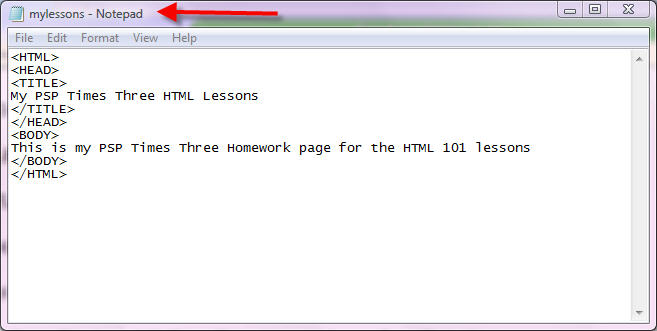
Your Notepad should look like this:
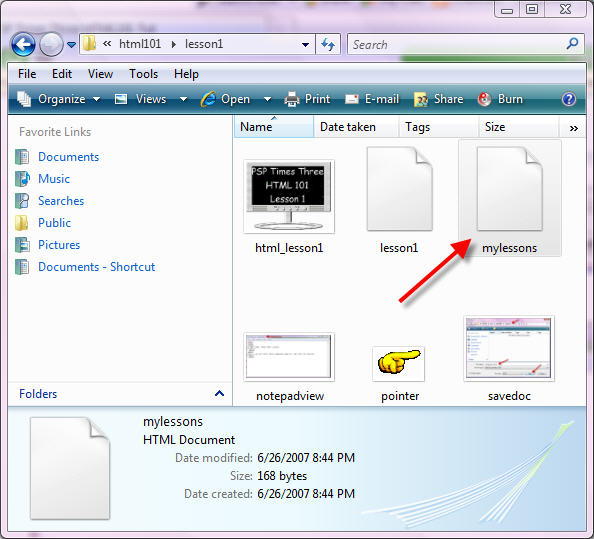

Keep practicing with these 4 major tags so you won't forget them. Now go to your free web site and look for a place to upload files. Once you find it browse for this homework page and upload it. Because free servers can vary on procedure I don't have specific instructions on where their upload area may be located. You will have to login there and look around. Once you locate it and upload your file be sure to send through your link to our group mail. It could be something like this:
http://myfreewebsitepage/myname/lessonfoldername/mylesson.html
Good luck and if you have any questions just send them on to us!
Next lesson we will expand with tags and show you how to add color to your background!
~~~~~~~~~~~~~~~~
Any similarities to other tutorials is merely a coincidence.
©
PSP Times Three
~July 2007~