
Preparations:
~~~~~~~~~~~~~~~~
Tutorials Index
This Lesson was written by
Cathie for PSP Times Three.
This lesson will teach you about Fonts, making text Bold, using Italics, and how to make your text Size smaller or larger. It will also cover various types of Fonts.

TEXT
Let's Be Bold:
This is my <B>PSP Times Three</B> Homework page for the HTML 101 lessons.
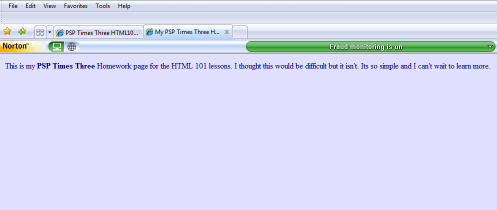
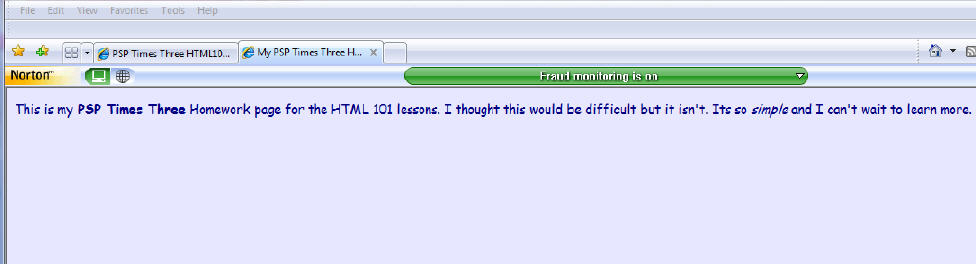
Next, go to File/Save. Then on your HTML document page go to "View" then "Refresh". Your page should now show up with the bold like this:
This is my PSP Times Three Homework page for the HTML 101 lessons.
When adding the Bold set of tags be sure to keep them directly next to the beginning and end of word or words you want bold. If you leave a blank space it won't make a difference if only using Bold Tags, but if you add a link or underline the word or words, it will show an extra underline in the blank space.
I thought this would be difficult but it isn't. Its so simple and I can't wait to learn more.
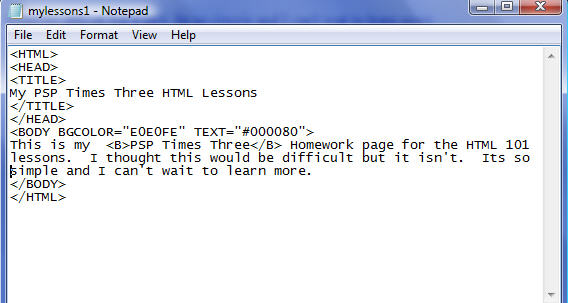
Your document should now read:
This is my PSP Times Three Homework page for the HTML 101 lessons. I thought this would be difficult but it isn't. Its so simple and I can't wait to learn more.
Time For Italics:
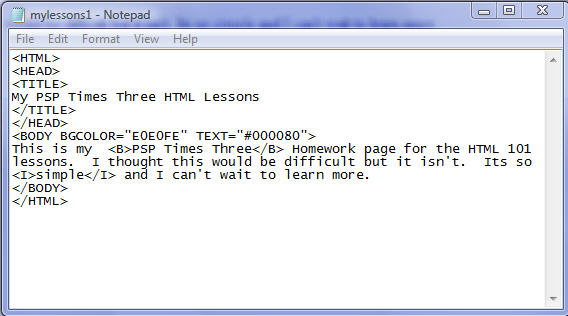
Its so <I>simple</I> and I can't wait to learn more.
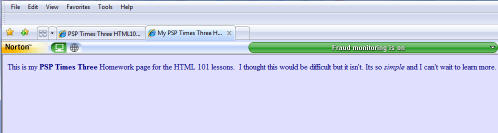
Your sentences should now look like this:
This is my PSP Times Three Homework page for the HTML 101 lessons. I thought this would be difficult but it isn't. Its so simple and I can't wait to learn more.
Size 'Em Up!
Not trying to confuse you but a notation needs to be added here:
Font Size can be either a fixed size (from 1 to 7) or a relative size (using plus or minus). Usually the default text size is 3, so if you wanted to increase one level you would use a relative of +1 (3 plus 1 equals size 4). If you wanted to decrease one level you would use a relative of -1 (3 minus 1 equals size 2). Using the relative size helps viewers who have set their browser for a larger or smaller font size depending on their screen resolution or their eyesight. Experts claim it is always best to use the relative size and only use the fixed size when really needed. Unfortunately this tut writer does not comply with the experts and uses the fixed size because it is more convenient.
<BODY BGCOLOR="Your Color Code" TEXT="#Your Color Code">
<FONT SIZE="4">
This is my PSP Times Three Homework page for the HTML 101 lessons. I thought this would be difficult but it isn't. Its so simple and I can't wait to learn more.
Name That Font:
Comic Sans MS - This is my PSP Times Three Homework page for the HTML 101 lessons. I thought this would be difficult but it isn't. Its so simple and I can't wait to learn more.
Book Antiqua - This is my PSP Times Three Homework page for the HTML 101 lessons. I thought this would be difficult but it isn't. Its so simple and I can't wait to learn more.
Arial - This is my PSP Times Three Homework page for the HTML 101 lessons. I thought this would be difficult but it isn't. Its so simple and I can't wait to learn more.
Lucida Sans - This is my PSP Times Three Homework page for the HTML 101 lessons. I thought this would be difficult but it isn't. Its so simple and I can't wait to learn more.
And this is how the default Times New Roman would look:
Times New Roman - This is my PSP Times Three Homework page for the HTML 101 lessons. I thought this would be difficult but it isn't. Its so simple and I can't wait to learn more.
<FONT FACE="Your Font Name" SIZE="Your font size">
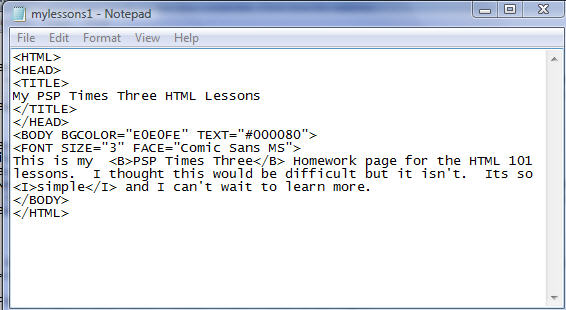
This is what your HTML notepad should resemble as well as your document:
REVIEW
ASSIGNMENT
Open your PSP Times Three Lessons HTML Document by double clicking on it and View/Source. Note that where you will be editing your HTML is marked with
Red Text here:
<HTML>
<HEAD>
<TITLE>My PSP Times Three HTML Lessons</TITLE>
</HEAD>
<BODY BGCOLOR="E0E0FE" TEXT="#000080">
<FONT SIZE="4" FACE="Your Chosen Font Name">
This is my
<B>PSP Times Three Homework</B>
page for the HTML 101 lessons. I thought this would be difficult but it isn't.
Its so
<I>simple</I>
and I can't wait to learn more.
</BODY>
</HTML>
Now go to your web site and upload your edited document. Once you do that be sure to send your link through our group mail with "HTML Lessons" in the Subject Line.
Keep practicing with the Bold and Italic tags and changing the Size and Face until you become familiar with them. Good luck and if you have any questions just send them on to us!
Next lesson you will learn about breaks, spacing, paragraphs, and headers.
~~~~~~~~~~~~~~~~
Any similarities to other tutorials is merely a coincidence.
©
PSP Times Three
~July 2007~