This lesson will be longer than the others. We will cover paragraphs, line breaks, extra spaces within a line, and headers. We will also learn how to insert a colored background image.
Preparations:
- 1. Use this pointing finger - to mark your place. Just drag it along as you read each line.

- 2. Open your PSP to use in this lesson
- 3. Open your PSP Times Three "mylessons" HTML Document.
- 4. Open your source code by going to View/Source.
GIVE ME SPACE!
- Whenever you use a typewriter keyboard to write an email or word processing you always use the enter key to move to the next line or change to another paragraph. When you type your sentences you usually hit the space bar twice to seperate them. In HTML you can use your enter/return key as many times as you want but it won't show up on your finished page. You can also hit that space bar many times and it won't make any difference in the spacing. Each of those requires special tags. One for paragraphs, one for line breaks, and one code for extra spacing.
Let's Make Paragraphs:
-
The tags used for paragraphs are <P> and </P>.
Open your lesson notepad and just before the first sentence insert the first Paragraph Tag and then the second Paragraph Tag at the end. It should look something like this:
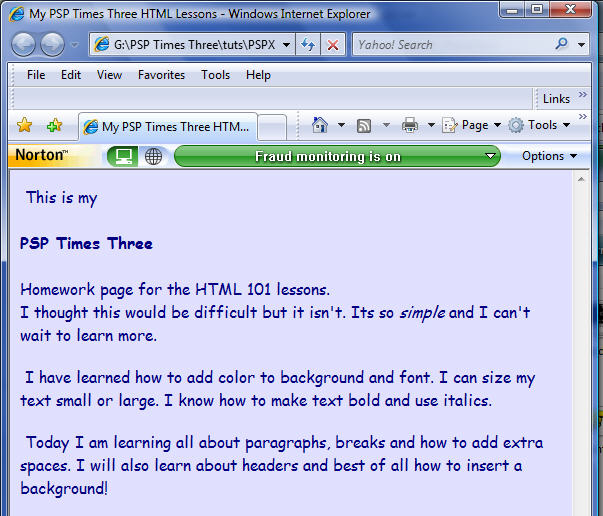
<P>This is my <B>PSP Times Three</B> Homework page for the HTML 101 lessons.I thought this would be difficult but it isn't. Its so <I>simple<I> and I can't wait to learn more.</P>
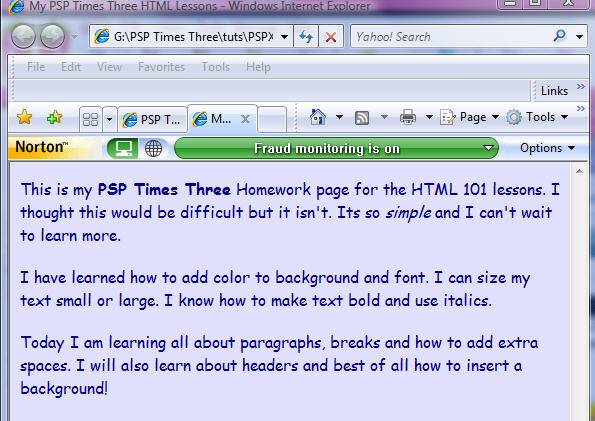
Now, add the following 2 paragraphs using the Paragraph Tags:
I have learned how to add color to background and font. I can size my text small or large. I know how to make text bold and use italics.
Today I am learning all about paragraphs, breaks and how to add extra spaces. I will also learn about headers and best of all how to insert a background!
Remember each paragraph starts with <P> and ends with </P>
Be sure to save your HTML when you make any edits. Then go to the document and View/Refresh to see how it looks. It should look something like this:
Break Time!
- Sometimes when you are writing a document you want to seperate a line from the paragraph. To do this you need to use the tag <BR>
- Let's apply that Break Tag to your lesson document. Using the very first sentence apply the tag as follows:
<P>This is my <B>PSP Times Three</B> Homework page for the HTML 101 lessons.<BR>
Save your edits and refresh your document. It should now read:
This is my PSP Times Three Homework page for the HTML 101 lessons.
I thought this would be difficult but it isn't. Its so simple and I can't wait to learn more.
- Now, if you place two Break Tags together <BR><BR> you will get a double space between lines. It is similar to a new paragraph. Actually I shouldn't mention that here but I tend to use the Break Tags more than I do Paragraph Tags. It is not the correct way to do it but it is how I prefer.
Let's try it out here using that first sentence again:
<P>This is my<BR><BR> <B>PSP Times Three</B><BR><BR> Homework page for the HTML 101 lessons.<BR>
Save your edits and refresh your document. This is how it should now look:
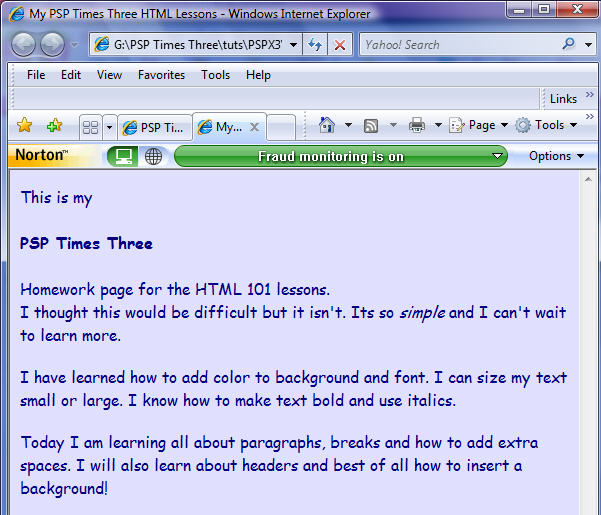
Remember, the more Break Tags you place together, the more line spaces you'll end up with.
Space Wanted!
- Whenever you type any message or text either in word processing or email or a plain document, you simply hit the space bar to gain as much space as you need. Especially between sentences - always have an extra space.
With HTML this does not work because browsers collapse all spaces down to one. You need to place a special code that will prevent this from happening. Then you will be able to space out as much as you like!
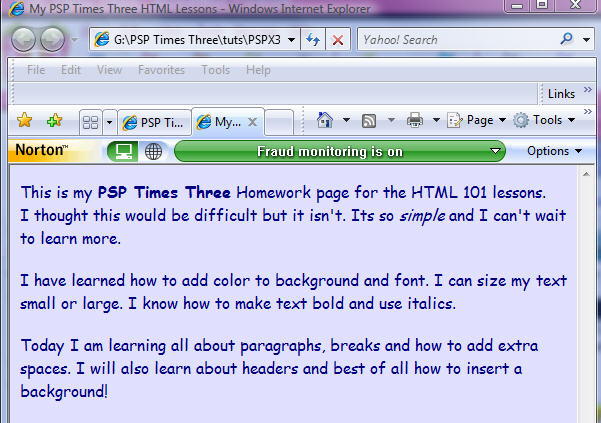
- This code is . It is known as a non-breaking space. This code will leave a permanent space wherever you place it. You can use this to place spaces between graphics by repeating the code several times. The more you place it the more permanent spaces you get. It is also a neat tool to use when you want to indent a paragraph too!
- Go to your lesson notepad and add a space at the beginning of each paragraph. Save and refresh. Your lesson should now look like this:
Note: If you happen to be using Geocities Advanced Editor you will not see those codes after you have saved and open again. The spaces are there but you won't see the codes. It's something in their editor that causes this to happen.
Heads Up!
-
A header is used to section off different parts of a document. They are similar to what you see above here with "Heads Up!". This lesson will only briefly cover these as this tut writer is not crazy about them and never uses them. But to teach good HTML habits it is necessary we cover them.
- The Header Tags are <H#> and </H#> with that number symbol being replaced by a number from 1 to 6 with 1 being the largest and 6 the smallest.
- When using Header Tags you will discover they not only make the text larger but they also make it bold. Therefore, you do not need to use the Bold <B> ... </B> Tags. You will not need to use the Paragraph <P> Tags either as they seperate themselves with the Header Tag.
Note: Do not confuse the Header Tag numbers with the Font Tag numbers. The Font sizes begin with 1 as the smallest and Header sizes begin with 1 as the largest.
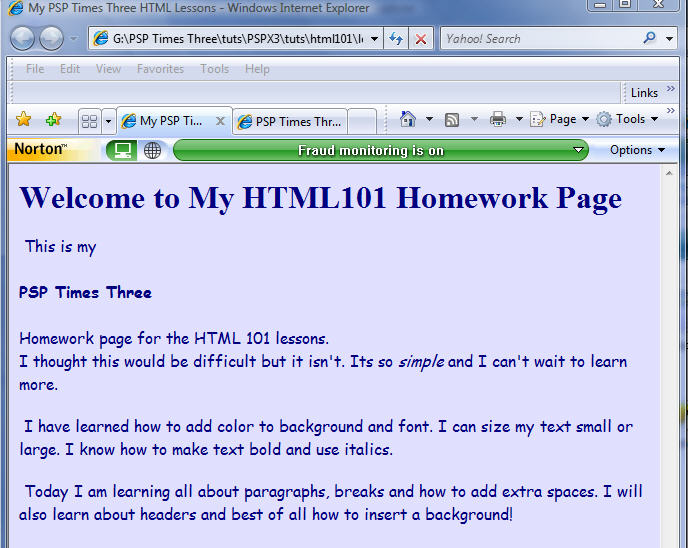
- Let's give this a try. Go to your HTML notepad, and just under your <BODY> Tag add the following as show in this example:
<BODY BGCOLOR="E0E0FE" TEXT="#000080">
<H1>Welcome to My HTML101 Homework Page</H1>
<FONT SIZE="3" FACE="Comic Sans MS">
<P> This is my <BR><BR> <B>PSP Times Three</B> <BR><BR> Homework page for the HTML 101 lessons.<BR>
I thought this would be difficult but it isn't. Its so <I>simple</I> and I can't wait to learn more.</P>
- Your page should now look something like this:
Background Image?
-
You have already learned how to give your background color. Now you will be adding an image. This is part of the <BODY> Tag and matches the color choice you made using the color chart. Note: you can only have one opening <BODY> Tag.
- Open your PSP program and create a transparent image 150 pixels wide by 150 pixels high. Yes, that small. This background will tile for you in your browser when you place it in your HTML. Once you have the transparent image, flood fill with a color that is "close" to your background color but a shade off so you can see the difference. Save as jpg with the file name of bkgd and save it in the same folder as you have your HTML document.
Note: Down the line you will be able to use gif backgrounds too! For this lesson we are staying within a shade of the plain color background. Please keep your background close to your color choice already in your Tag. Keep in mind when placing any background that you want it to be easy to view for visitors and that your text will appear clearly and readable.
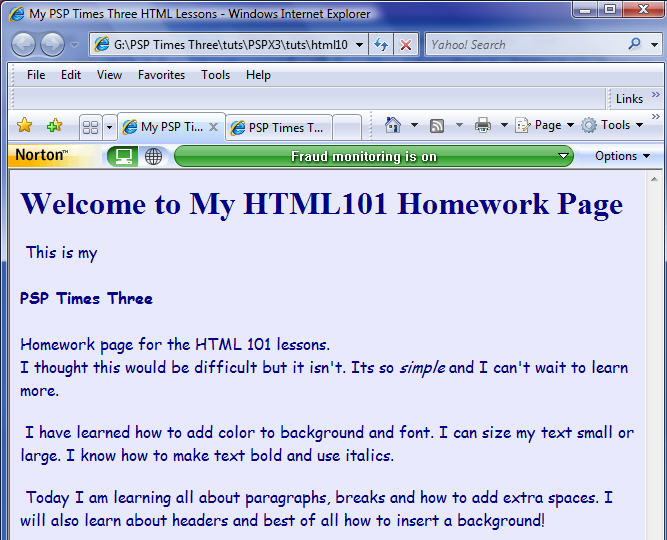
- Go to your <BODY> Tag and insert as follows:
<BODY BACKGROUND="bkgd.jpg" BGCOLOR="E0E0FE" TEXT="#000080">
Save and refresh. Your page should now resemble this:
REVIEW
- In Lesson 1 you learned the required elements for a basic HTML document. You were given your assignment and set up your first HTML webpage.
- Lesson 2 explained about Tags/Codes and how to use the View/Source to obtain different codes so you can set up your website the way you would like it to appear. You also learned about Attributes and Values to add some color to your background and text, along with how and where to place them in your HTML document.
- Lesson 3 explained how to make words Bold, use Italics, and all about Fonts - Size and Type.
- Lesson 4 taught you all about paragraphs, extra spacing, break lines, headers, and how to use a background graphic.
ASSIGNMENT
- Your assignment for this lesson is to double check all your new HTML and make sure you have everything as explained above. Then save and go to your web site and upload the newly edited document. When finished be sure to send the link through our group mail with "HTML Lessons" in the subject Line.
Good luck and if you have any questions just send them on to us!
Next lesson will be fun. We will cover alignments, centering, underlines, and inserting images.
~~~~~~~~~~~~~~~~
Lesson One
Lesson Two
Lesson Three
Tutorials Index
~~~~~~~~~~~~~~~~
This Lesson was written by
Cathie for PSP Times Three.
Any similarities to other tutorials is merely a coincidence.
©
PSP Times Three
~August 2007~